Java 基础

Java 基础
original_author1 Java基本语法
1. 输出 Hello World
创建.java结尾的文件
每个文件由类构成
类中有一个main方法,代表程序的入口
2
3
4
5
public static void main(String[] args) {
System.out.println("Hello World");
}
}2. 基本概念和运行原理
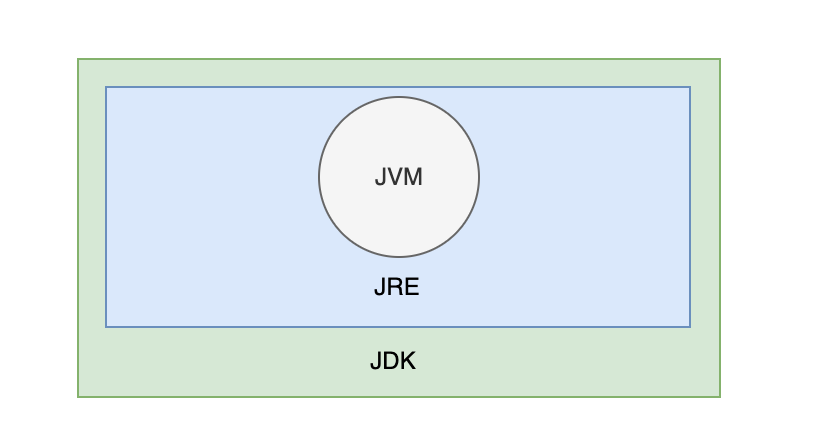
JDK:开发Java应用的工具包
JDK => 包含编译工具JAVAC、运行环境JRE、其他工具
JAVAC => 将.java文件编译成字节码文件.class
JRE => JRE中的JVM会将字节码文件转换为不同设备上的机器码运行 => 可以跨平台运行的原因
1.1 数据类型
1.1.1 基本数据类型
包括
byte、short、int、long、float、double、boolean和char8种1
2
3
4int myNum = 5; // 整数
float myFloatNum = 5.99f; // 浮点数
char myLetter = 'D'; // 字符
boolean myBool = true; // 布尔值数据类型 大小 描述 byte1 字节 存储从 -128 到 127 的整数。 short2 字节 存储从 -32,768 到 32,767 的整数。 int4 字节 存储从 -2,147,483,648 到 2,147,483,647 的整数。 long8 字节 存储从 -9,223,372,036,854,775,808 到 9,223,372,036,854,775,807 的整数。 float4 字节 存储小数。足以存储 6 到 7 位十进制数字。 double8 字节 存储小数。足以存储 15 位十进制数字。 boolean不确定 存储 true 值或 false 值。 char2 字节 存储单个字符/字母或 ASCII 值
1.1.2 引用数据类型
- 包括字符串、数组、类等
1.1.3 包装类型
包装类型是 Java 中的一种特殊类型,用于将基本数据类型转换为对应的对象类型。
包装类型提供了许多实用的方法
1
2
3
4
5
6
7
8
9
10
11
12
13
14
15
16
17// 3. 包装类型
Integer integerValue1 = new Integer(11); // 每次都创建新对象
Integer integerValue2 = Integer.valueOf(22); // 优先用缓存对象,把数字 22 转换成【整数对象】
Integer integerValue3 = 33;
System.out.println("integerValue1 = " + integerValue1);
System.out.println("integerValue2 = " + integerValue2);
System.out.println("integerValue3 = " + integerValue3);
// 将字符串转换为整数
String numberString = "123";
int parsedNumber = Integer.parseInt(numberString);
System.out.println("parsedNumber = " + parsedNumber);
// 数字比较
Integer a = 10; // 转成Integer后才能使用equals方法
Integer b = 20;
System.out.println(a.equals(b)); // 输出 false对应基本数据类型的8种包装类型:
- Byte(对应 byte)
- Short(对应 short)
- Integer(对应 int)
- Long(对应 long)
- Float(对应 float)
- Double(对应 double)
- Character(对应 char)
- Boolean(对应 boolean)
1.1.4 类型转换
放大转换(自动) - 将较小的类型转换为较大的类型
byte->short->char->int->long->float->double1
2
3
4
5
6
7
8
9
10
11
12
13
14
15
16
17
18
19// 4. 类型转换--隐式转换
// 4.1自动转换,小类型到大类型
int myInt = 3;
float myFloat1 = myInt; // 自动转为 float
char myChar = 'A';
myInt = myChar;
float myFloat2 = myChar;
System.out.println("myFloat = " + myFloat1); // 输出 3.0,float类型
System.out.println("myInt = " + myInt);
System.out.println("myFloat2 = " + myFloat2);
// 运算中自动转换类型
float myFloat3 = 1.5f;
double myDouble = 1.2;
int num1 = 1;
int num2 = 2;
double res = myFloat3 * num1 + myDouble * num2;
System.out.println(res); // double类型缩小转换(手动) - 将较大的类型转换为较小的类型
double->float->long->int->char->short->byte1
2
3
4
5
6
7
8
9
10// 3.2手动转换,大类型到小类型
int myInt2 = 72;
float myFloat4 = 2.1f;
char myChar2 = (char) myInt2;
// myInt2 = (int) myInt * myFloat4; -> 错误写法,只是强转了后面的当个变量或表达式
myInt2 = (int) (myInt2 * myFloat4);
System.out.println("myChar2 = " + myChar2); // 输出2(2对应的ACSII码为 H)
System.out.println("myInt2 = " + myInt2); // 输出 151踩坑点
1
2
3
4
5int a = 1500000000, b = 1500000000;
int res1 = a + b; // -1294967296
long res2 = a + b; // -1294967296
long res3 = (long)a + b; // 3000000000
long res4 = (long)(a + b); // -1294967296res1: 由于超出了int可存储的范围,溢出;
res2: 尽管隐式转换前已经溢出
res2: a被强转成long,此时再与b相加,b会隐式自动转为long,就不会溢出
res4: 同res2,再加法完成后已经溢出,再隐式转换还是强制转换都不管用了
1.2 基本语法
运算、循环、分支同大多数语言
1.3 字符串
1 | String S = "Hello"; |
Java 中的字符串实际上是对象,拥有可对字符串执行操作的方法。例如,可以用
length()方法确定字符串的长度:
1.3.1 字符串方法
1 | System.out.println("===== 获取字符串信息 ====="); |
1.3.2 字符串拼接
1 | String firstName = "Bi"; |
1.3.3 特殊字符
因为字符串必须写在引号内,Java 会误解包含引号的字符串,并产生错误:
1 | String txt = "abc"d"e."; // d的位置会报错 |
反斜杠 (\) 转义字符将特殊字符转换为字符串字符:
| 转义字符 | 结果 |
|---|---|
| \’ | ' |
| \“ | " |
| \\ | \ |
| \n | 换行 |
| \r | 回车 |
| \t | 制表符 |
| \b | 退格 |
1.4 数组
存储固定大小的相同类型元素 的数据结构
1.4.1 基本特点
- 固定大小 :一旦创建,数组的大小不能改变。
- 同类型元素 :数组中的所有元素必须是相同的类型。
- 连续内存 :数组在内存中是连续存储的,因此可以通过索引快速访问元素。
- 零基索引
:数组的第一个元素的索引是
0,最后一个元素的索引是length - 1,访问数组时超出索引会报错。
1.4.2 声明与初始化
1 | // 数组基本概念 |
1.4.3 数组常用方法
1 | // 数组常用方法 |
2 面向对象
2.1 类基本介绍
| 类 | 对象 |
|---|---|
| 动物 | 猫、狗、鸡 |
| 车 | 奔驰、宝马 |
2.1.1 类的基本结构
- 属性(Field) :也称为成员变量或字段,用于描述对象的状态。
- 方法(Method) :用于定义对象的行为或操作。
- 构造方法(Constructor) :用于创建类的实例,并初始化对象的状态。
- 内部类(Inner Class,可选) :定义在另一个类内部的类。
1 | public class 类名 { |
类的访问修饰符有public、默认、final。
public是任何类都能访问该类,默认只能在同一个包中访问,final阻止其他类去继承它。
2.1.2 类属性
2.1.2.1 访问修饰符:
private:作用范围仅限于定义该成员的类内部default:作用范围仅限于同一包内的类。protected:作用范围包括同一包内的类以及不同包中的子类。public:作用范围对所有类开放,没有任何访问限制。访问范围:
访问修饰符 同一类 同一包 子类(不同包) 其他包 private✔️ ❌ ❌ ❌ default✔️ ✔️ ❌ ❌ protected✔️ ✔️ ✔️ ❌ public✔️ ✔️ ✔️ ✔️ 代码示例:
1
2
3
4
5
6public class myCar {
private String model; // 私有属性,只能在myCar类中访问
protected int year; // 受保护属性,同一包和子类可访问
String color; // 默认属性,同一包可访问
public double price; // 公共属性,所有类可访问
}
2.1.2.2 其他修饰符:
static:声明为静态字段,属于类本身而非实例。final:声明为常量,值不可修改。
2.1.3 类方法
1 | [访问修饰符] [其他修饰符] 返回值类型 方法名(参数列表) { |
2.1.3.1 方法类型
静态方法
使用
static修饰符声明的方法属于类本身,可以通过类名直接调用
不能直接访问实例字段或实例方法
非静态方法
未使用
static修饰符的方法属于类的实例,必须通过对象调用
可以访问非静态字段和其他方法
构造方法
与类同名且没有返回值类型的方法
用于创建类的实例并初始化对象的状态
1
2
3
4
5
6
7
8
9
10public class Person {
private String name;
private int age;
// 构造方法
public Person(String name, int age) { // 可有参数、可无参数
this.name = name;
this.age = age;
}
}
2.1.3.2 方法访问修饰符
同 类的属性
2.2 封装、继承、多态
2.2.1 封装
定义 :封装是将类的内部实现细节隐藏起来,并通过公共方法(getter 和 setter)提供受控的访问。
目的
提高安全性
通过隐藏字段并提供受控的访问方法,可以防止外部类直接修改字段,从而避免非法操作。
可以在 setter 方法中添加校验逻辑,确保字段值的有效性。
增强可维护性
如果需要修改内部实现,只需调整类的内部逻辑,而无需修改外部代码 -> 例如,我要将年龄从int改为String,不用再外部一个一个改了,而是在内部统一处理
1
2
3
4
5
6
7
8
9
10
11
12
13
14
15
16
17
18public class Person {
private String name;
private int age;
// ...省略name的getter、setter方法
public int getAge() {
return age;
}
public void setAge(int age) {
if (age > 0) { // 添加校验逻辑
// this.age = age;
this.age = String.valueOf(age); // 若后期需更改
} else {
System.out.println("年龄必须为正数!");
}
}
}
隐藏信息,实现细节
例如性别在数据库中存储为0、1,但要展示为男,女
1
2
3
4
5
6
7
8
9public String getSexName() {
if("0".equals(sex)){
sexName = "女";
}
else if("1".equals(sex)){
sexName = "男";
}
return sexName;
}
2.2.2 继承
继承 允许一个类(称为子类或派生类)从另一个类(称为父类或基类)继承属性和方法。通过继承,子类可以复用父类的代码,并且可以在子类中添加新的功能或修改现有的功能。
2.2.2.1 继承的特点
代码复用 :子类可以直接使用父类的属性和方法,避免了重复编写代码。
扩展性 :子类可以在继承父类的基础上,添加新的属性和方法,或者重写父类的方法。
多态性 :通过继承,Java支持多态性,即同一个方法可以在不同的子类中有不同的实现。
2.2.2.2 继承知识点
子类中super.a、super.a()、super() -> 分别拿到了父类属性,调用了父类方法,构造方法
子类可重写父类方法(加上@Override更规范,编译器可以帮助我们检查)
final方法不能被重写
final类不能被继承
多态:父类引用指向了子类的对象,会调用该子类重写的方法。
1
2
3
4
5
6
7
8
9
10
11
12
13
14
15
16
17
18
19
20
21
22
23
24
25
26
27
28
29
30
31
32
33
34
35
36
37
38
39
40
41
42
43
44
45
46
47
48
49
50
51
52
53
54
55
56
57
58
59
60
61
62
63
64
65
66
67
68
69
70
71
72
73
74
75
76
77/ 父类
class Parent {
int a = 10; // 父类属性
String name = "Parent";
// 父类构造方法
public Parent(int a) {
this.a = a;
System.out.println("Parent constructor called with a = " + a);
}
// 父类方法
void greet() {
System.out.println("Hello from Parent");
}
// final 方法,不能被子类重写
final void finalMethod() {
System.out.println("This is a final method in Parent");
}
}
// 子类继承父类
class Child extends Parent {
String name = "Child"; // 子类属性,隐藏了父类的 name 属性
// 子类构造器,显式调用父类构造器
public Child() {
super(20); // 调用父类构造器,传入初始值 20
System.out.println("Child constructor called");
}
// 重写父类的 greet 方法
void greet() {
super.greet(); // 调用父类的 greet 方法
System.out.println("Hello from Child");
}
// 子类新增的方法
void printNames() {
System.out.println("Child name: " + name); // 就近原则,访问子类的 name
System.out.println("Parent name: " + super.name); // 访问父类的 name
}
}
// 防止继承的类
final class FinalClass {
void display() {
System.out.println("This is a final class and cannot be extended");
}
}
// 主类,用于测试继承的知识点
public class InheritanceStudy {
public static void main(String[] args) {
// 创建子类对象
Child child = new Child();
// 调用子类方法
child.printNames();
child.greet();
// 多态性:父类引用指向子类对象
Parent parentRef = new Child(); // 属性是Parent的,但是方法用的是Child的
parentRef.greet(); // 调用的是子类重写的方法
// 访问父类的属性
System.out.println("Parent's a: " + parentRef.a);
// final 方法调用
child.finalMethod();
// 尝试创建 FinalClass 的子类(会报错)
// class SubFinalClass extends FinalClass {} // 错误:不能继承 final 类
}
}
2.2.3 多态
同一个方法调用在不同的对象上表现出不同的行为。
2.2.3.1 前提条件
- 子类继承父类
- 子类重写父类的方法
- 父类引用指向子类的对象
2.2.3.2 例子
基本表现:父类引用指向子类对象,此时调用父类的方法会优先看子类是否重写此方法
向下转型:若父类引用指向子类对象,则可向下转型,将该对象转为子类引用,转型后可以调用父类原本没有的方法。若父类引用指向的是父类对象,则会转型失败。
应用场景:统一管理不同类型的对象
注意点:父类无法调用子类特有的方法,转型后可以调用
1
2
3
4
5
6
7
8
9
10
11
12
13
14
15
16
17
18
19
20
21
22
23
24
25
26
27
28
29
30
31
32
33
34
35
36
37
38
39
40
41
42
43
44
45
46
47
48
49
50
51
52
53
54
55
56
57
58
59
60
61
62
63
64
65// 父类
class Animal {
// 父类方法
void sound() {
System.out.println("Animal makes a sound");
}
}
// 子类 Dog,重写了父类的 sound 方法
class Dog extends Animal {
void sound() {
System.out.println("Dog barks");
}
// 子类特有的方法
void fetch() {
System.out.println("Dog fetches the ball");
}
}
// 子类 Cat,重写了父类的 sound 方法
class Cat extends Animal {
void sound() {
System.out.println("Cat meows");
}
// 子类特有的方法
void scratch() {
System.out.println("Cat scratches the furniture");
}
}
// 主类,用于测试多态
public class PolymorphismStudy {
public static void main(String[] args) {
// 1. 多态的基本表现:父类引用指向子类对象
Animal myAnimal = new Dog(); // 父类引用指向 Dog 对象
myAnimal.sound(); // 输出 "Dog barks",调用的是子类重写的方法
myAnimal = new Cat(); // 父类引用指向 Cat 对象
myAnimal.sound(); // 输出 "Cat meows",调用的是子类重写的方法
// 2. 多态与类型转换
// 向下转型:将父类引用转换为子类引用
Animal animalRef = new Dog(); // 父类引用指向子类对象
// Animal animalRef = new Animal();
// Dog dog = (Dog) animalRef; 会报错,父类引用指向的是子类对象才能向下转型成功
if (animalRef instanceof Dog) { // 检查实际类型是否是 Dog
Dog dog = (Dog) animalRef; // 向下转型
dog.fetch(); // 调用子类特有的方法
}
// 3. 多态的应用场景:统一管理不同类型的对象
Animal[] animals = {new Dog(), new Cat()}; // 使用数组存储不同子类的对象
for (Animal animal : animals) {
animal.sound(); // 根据实际类型调用相应的方法
}
// 4. 注意事项:父类引用无法直接调用子类特有的方法
// animalRef.fetch(); // 错误:父类引用无法调用子类特有的方法
}
}多态中构造方法的调用顺序
父类构造方法 => 多态方法(但子类变量父类拿不到,初始化为0)=> 子类构造方法 => 子类的方法
1
2
3
4
5
6
7
8
9
10
11
12
13
14
15
16
17
18
19
20
21
22
23
24
25
26
27
28
29
30
31public class Dog extends Animal {
private int age = 2;
public Dog(int age) {
this.age = age;
System.out.println("I am dog, my age is:" + this.age);
}
public void sound() { // 子类覆盖父类方法
System.out.println("I am dog, my age is:" + this.age);
}
public static void main(String[] args) {
new Dog(2);
// before sound
// I am dog, my age is:0
// after sound
// I am dog, my age is:2
}
}
class Animal {
int age = 99;
Animal () {
System.out.println("before sound");
sound();
System.out.println("after sound");
}
public void sound() {
System.out.println("I am animal");
}
}
3 抽象、接口、内部类
3.1 抽象类
为子类提供一个通用的模版和框架,定义一些通用的逻辑或规范,同时允许子类根据需要实现具体功能。
1、抽象类不能被实例化。
2、抽象类应该至少有一个抽象方法,否则它没有任何意义。
3、抽象类中的抽象方法没有方法体。
4、抽象类的子类必须给出父类中的抽象方法的具体实现,除非该子类也是抽象类。
1 | // 抽象类 Animal |
3.2 接口
定义一组行为规范
接口通过抽象方法定义了一组行为规范,强制实现类实现这些方法
一个类可以实现多个接口,从而表现出多种行为
字段默认是
public static final,用于定义全局常量表示can do what
如果一个类实现的多个接口中有同名的默认方法,需要手动解决冲突
1
2
3
4
5
6
7
8
9
10
11
12
13
14
15
16
17
18
19
20
21
22
23
24
25
26
27
28
29
30
31
32
33
34
35
36
37
38
39
40
41
42
43
44
45
46
47
48
49
50
51
52
53
54
55
56
57
58
59
60
61
62
63
64
65
66
67
68
69
70
71
72
73
74
75
76// 定义接口 Flyable
interface Flyable {
// 静态常量(全局常量)
int MAX_SPEED = 1000; // 默认是 public static final
// 抽象方法:所有实现类必须实现
void fly();
// 默认方法(Java 8 引入):提供默认实现
default void land() {
System.out.println("Landing...");
}
// 静态方法(Java 8 引入):通过接口名调用
static void info() {
System.out.println("This is the Flyable interface.");
}
}
// 实现类 Bird
class Bird implements Flyable {
private String name;
public Bird(String name) {
this.name = name;
}
public void fly() {
System.out.println(name + " is flying in the sky with a max speed of " + Flyable.MAX_SPEED + " km/h.");
}
public void land() {
System.out.println(name + " is landing gracefully.");
}
}
// 实现类 Airplane
class Airplane implements Flyable {
private String model;
public Airplane(String model) {
this.model = model;
}
public void fly() {
System.out.println(model + " is flying at high altitude with a max speed of " + Flyable.MAX_SPEED + " km/h.");
}
}
// 测试类 Main
public class Main {
public static void main(String[] args) {
// 调用静态方法
Flyable.info(); // 输出:This is the Flyable interface.
// 访问静态变量
System.out.println("Max speed for all Flyable objects: " + Flyable.MAX_SPEED + " km/h.");
System.out.println();
// 创建 Bird 对象
Flyable bird = new Bird("Sparrow");
bird.fly(); // 输出:Sparrow is flying in the sky with a max speed of 1000 km/h.
bird.land(); // 输出:Sparrow is landing gracefully.
System.out.println(bird.MAX_SPEED + " km/h."); //1000 km/h -> 这种写法不会报错,但它实际上是 语法糖 ,编译器会自动将其转换为通过接口名访问的形式: System.out.println(Flyable.MAX_SPEED + " km/h.");
System.out.println();
// 创建 Airplane 对象
Flyable airplane = new Airplane("Boeing 747");
airplane.fly(); // 输出:Boeing 747 is flying at high altitude with a max speed of 1000 km/h.
airplane.land(); // 输出:Landing...(使用默认实现)
}
}
3.3 抽象类和接口的区别
| 特性 | 接口 | 抽象类 |
|---|---|---|
| 定义方式 | 使用interface关键字定义 |
使用abstract关键字定义 |
| 成员变量 | 只能是public static final |
可以是普通变量或静态变量 |
| 构造器 | 不允许定义构造器 | 可以定义构造器 |
| 多重继承 | 支持多重实现 | 不支持多重继承 |
| 设计目的 | 定义行为规范(can-do) | 定义通用结构(is-a) |
3.4 内部类
根据自己想限定的作用范围,来决定使用哪种。
- 成员内部类
- 静态嵌套类
- 局部内部类
- 匿名内部类 -> 就是没有名字的类
1 | public class Main { |
4 集合
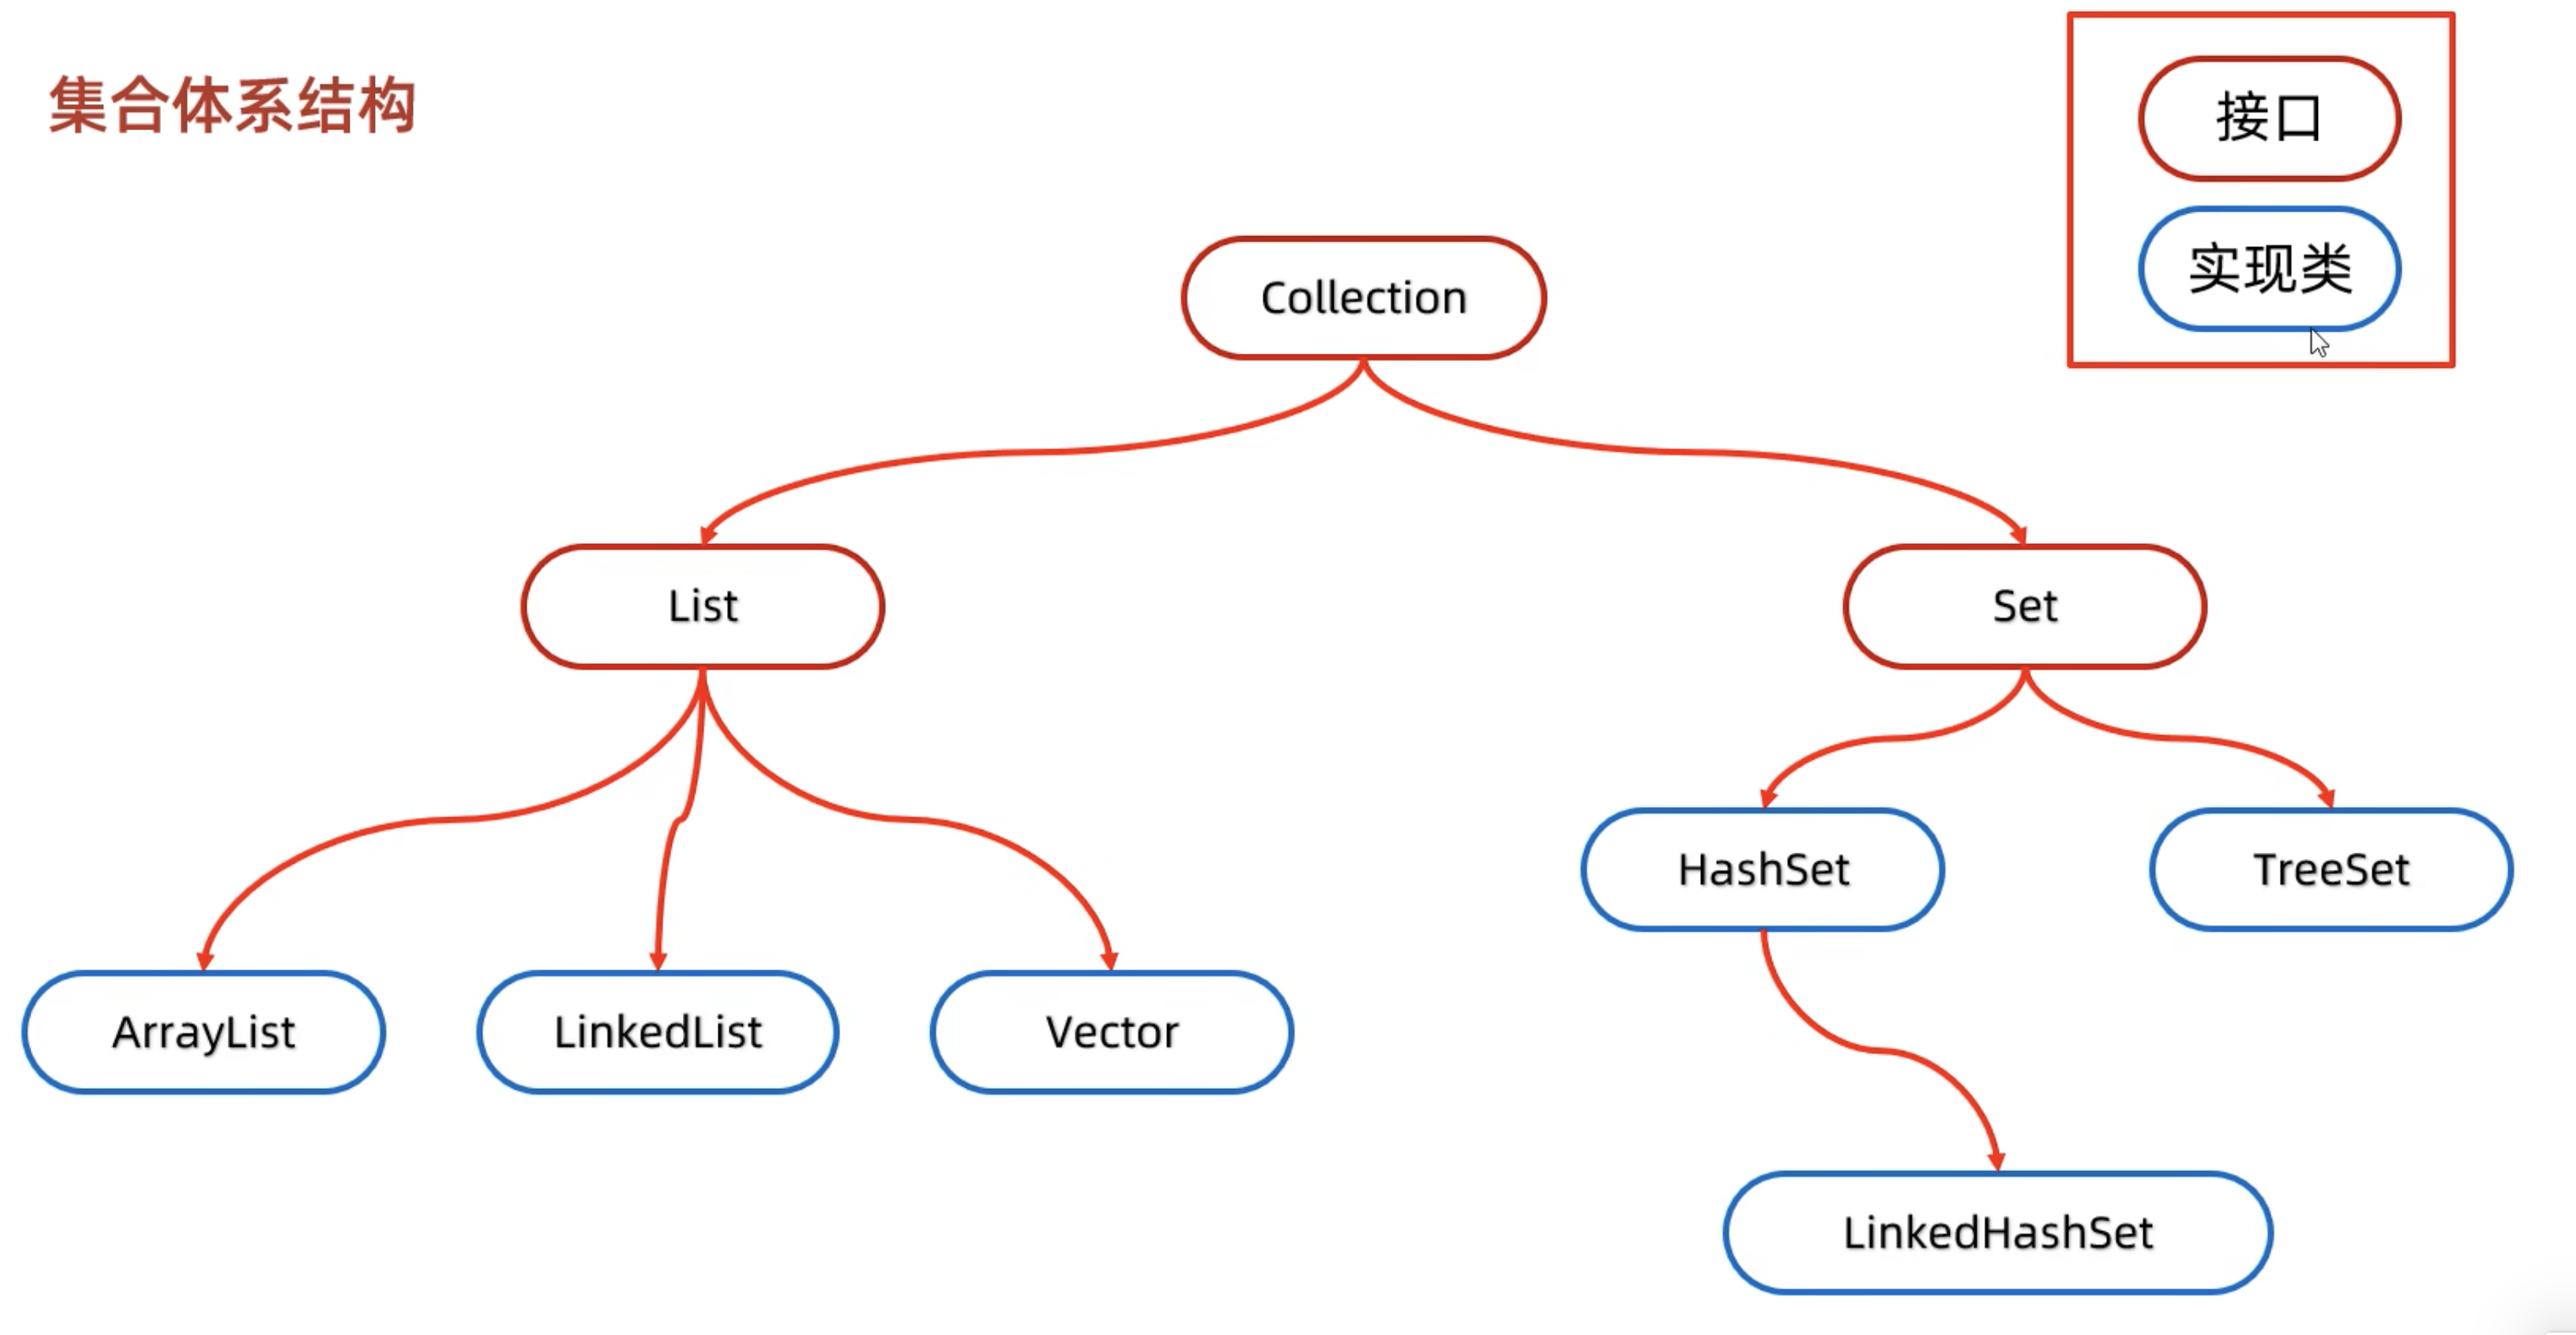
4.1 Collection
Collection是 Java 集合框架的根接口,位于java.util包中。它表示一组对象(称为元素),并且定义了对集合进行基本操作的方法
4.1.1 Collection接口核心方法
| 方法名 | 描述 |
|---|---|
boolean add(E e) |
向集合中添加一个元素。 |
boolean remove(Object o) |
从集合中移除指定的元素。 |
boolean contains(Object o) |
判断集合是否包含指定的元素。 |
int size() |
返回集合中的元素数量。 |
boolean isEmpty() |
判断集合是否为空。 |
void clear() |
清空集合中的所有元素。 |
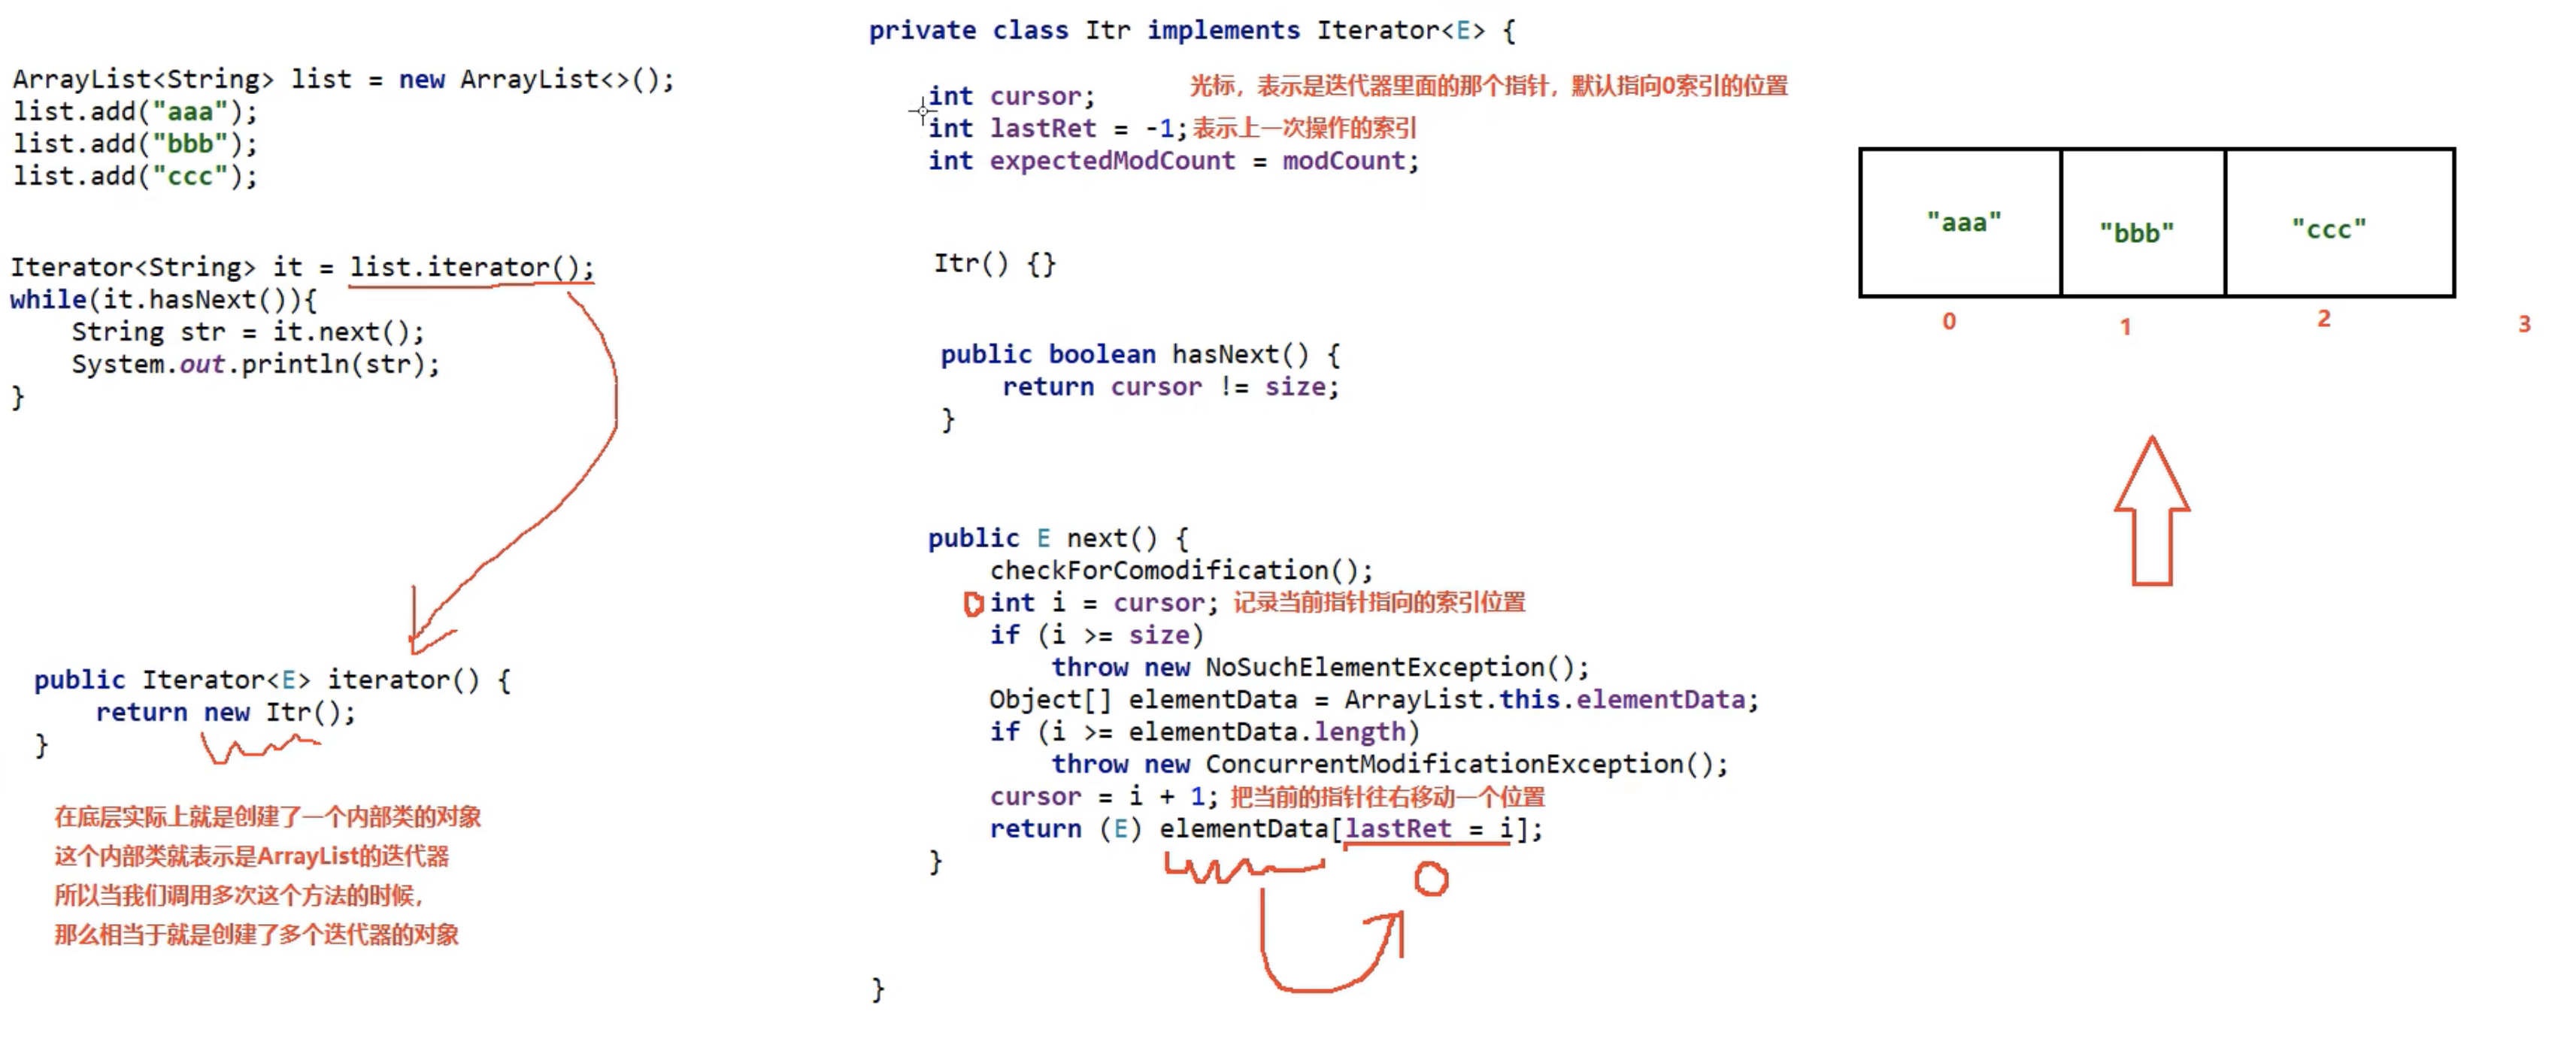
Iterator<E> iterator() |
返回一个迭代器,用于遍历集合中的元素。 |
4.1.2 例子
1 | import java.util.ArrayList; |
4.2 List
表示有序集合的接口
4.2.1 List特有的核心方法
| 方法名 | 描述 |
|---|---|
void add(int index, E element) |
在指定索引位置插入一个元素。 |
E get(int index) |
返回指定索引位置的元素。 |
E set(int index, E element) |
替换指定索引位置的元素,并返回被替换的旧元素。 |
E remove(int index) |
移除指定索引位置的元素,并返回被移除的元素。 |
int indexOf(Object o) |
返回指定元素在列表中首次出现的索引,如果不存在则返回-1。 |
int lastIndexOf(Object o) |
返回指定元素在列表中最后一次出现的索引,如果不存在则返回-1。 |
List<E> subList(int fromIndex, int toIndex) |
返回从fromIndex(包含)到toIndex(不包含)范围内的子列表。 |
4.2.2 例子
1 | import java.util.ArrayList; |
4.3 ArrayList
通过特殊的设计实现了List接口,底层为数组结构
4.3.1 ArrayList底层原理
- 1.利用空参构造创建一个空数组
- 2.初始添加元素时将数组大小扩容为10
- 3.后续添加元素时超出了原数组大小,就自动扩容为1.5倍或者(原数组size+后续添加元素个数(如果大于1.5))
4.3.2 ArrayList源码
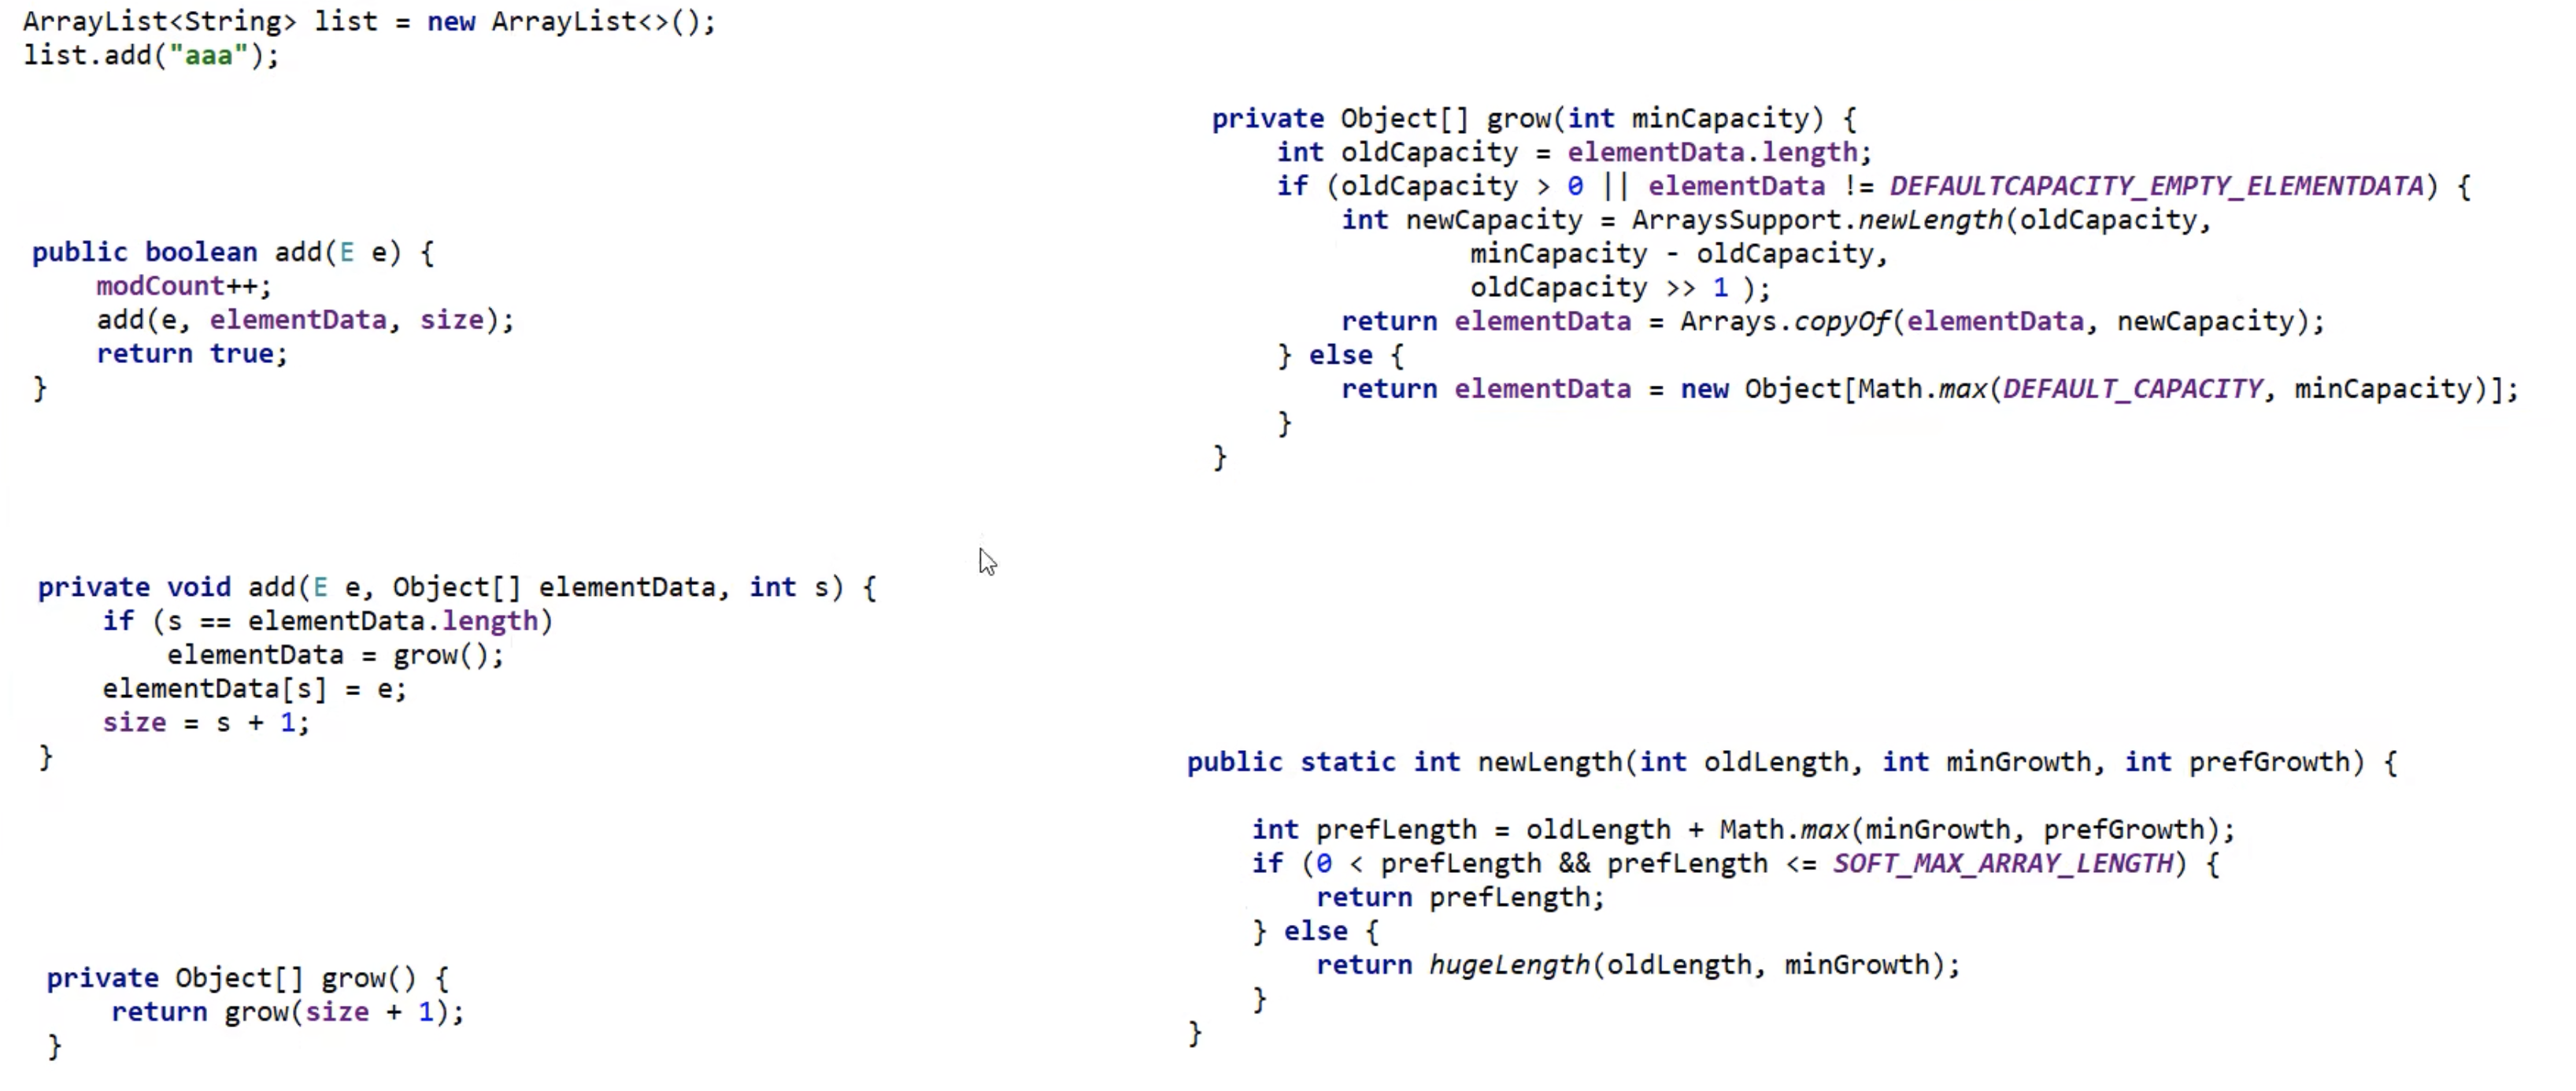
在扩容时重新取了一块储存空间,所以相对数组它的大小可以变,不怕周围没空间
4.4 LinkedList
底层数据结构为双链表,增删快,查询慢
4.4.1 LinkedList原理
- 基于双向链表,每个节点包含数据和前后指针
4.4.2 LinkedList源码
4.5 数据结构
- 二叉树,每个节点的度<=2
- 二叉查找树:任意节点左子树上的值都小于当前节点,右子树树上的节点都大于当前节点
- 平衡二叉树:任意节点左右子树高度差不超过1
- 红黑树:增删查改性能都很好的数结构
4.6 Set集合
4.6.1 Set接口
| 方法名称 | 说明 |
|---|---|
public boolean add(E e) |
把给定的对象添加到当前集合中 |
public void clear() |
清空集合中所有的元素 |
public boolean remove(E e) |
把给定的对象在当前集合中删除 |
public boolean contains(Object obj) |
判断当前集合中是否包含给定的对象 |
public boolean isEmpty() |
判断当前集合是否为空 |
public int size() |
返回集合中元素的个数/集合的长度 |
4.6.2 3个实现类

1 | import java.util.*; |
5 Map接口
常用方法:
| 方法名 | 描述 |
|---|---|
V put(K key, V value) |
将指定的键值对插入到Map中。如果键已经存在,则替换旧的值并返回旧值。 |
V get(Object key) |
返回指定键所映射的值,如果键不存在则返回null。 |
V remove(Object key) |
从Map中移除指定键及其对应的值,并返回被移除的值。 |
boolean containsKey(Object key) |
如果Map中包含指定的键,则返回true。 |
boolean containsValue(Object value) |
如果Map中包含指定的值,则返回true。 |
Set<K> keySet() |
返回Map中所有键的集合。 |
Collection<V> values() |
返回Map中所有值的集合。 |
Set<Map.Entry<K,V>> entrySet() |
返回Map中所有键值对的集合。 |
void clear() |
清空Map中的所有键值对。 |
int size() |
返回Map中键值对的数量。 |
6 泛型
- 泛型类:
class 类名<T> { ... } - 泛型接口:
interface 接口名<T> { ... } - 泛型方法:
<T> 返回值类型 方法名(参数列表) { ... }
1 | import java.util.ArrayList; |
7 异常处理
try-catch:主要用于捕获和处理异常 => 需要代码继续运行时使用throw:用于主动抛出异常,适合在检测到错误条件时通知调用者 => 不用代码继续运行时使用1
2
3
4
5
6
7
8
9
10
11
12
13
14
15
16
17
18
19
20
21
22
23
24
25
26
27
28
29
30
31
32
33
34
35
36
37
38
39
40
41
42
43
44
45
46
47
48
49
50
51
52
53
54
55
56
57
58
59
60
61
62
63
64
65
66
67import java.io.FileReader;
import java.io.IOException;
// 自定义异常类
class CustomException extends Exception {
public CustomException(String message) {
super(message);
}
}
public class ExceptionHandlingExample {
public static void main(String[] args) {
// 示例 1: 捕获非受检异常 (RuntimeException)
try {
int result = divide(10, 0); // 可能抛出 ArithmeticException
System.out.println("结果: " + result);
} catch (ArithmeticException e) {
System.out.println("捕获到运行时异常: " + e.getMessage());
}
// 示例 2: 处理受检异常 (Checked Exception)
try {
readFile("nonexistent.txt"); // 文件不存在会抛出 IOException
} catch (IOException e) {
System.out.println("捕获到 IO 异常: " + e.getMessage());
} finally {
System.out.println("finally 块总是执行");
}
// 示例 3: 抛出自定义异常
try {
validateAge(-5); // 年龄为负数时抛出自定义异常
} catch (CustomException e) {
System.out.println("捕获到自定义异常: " + e.getMessage());
}
}
// 方法 1: 可能抛出非受检异常的方法
public static int divide(int a, int b) {
if (b == 0) {
throw new ArithmeticException("除数不能为零");
}
return a / b;
}
// 方法 2: 可能抛出受检异常的方法
public static void readFile(String fileName) throws IOException {
FileReader reader = null;
try {
reader = new FileReader(fileName);
System.out.println("文件读取成功");
} finally {
if (reader != null) {
reader.close(); // 确保资源释放
}
}
}
// 方法 3: 抛出自定义异常的方法
public static void validateAge(int age) throws CustomException {
if (age < 0) {
throw new CustomException("年龄不能为负数");
}
System.out.println("年龄验证通过: " + age);
}
}